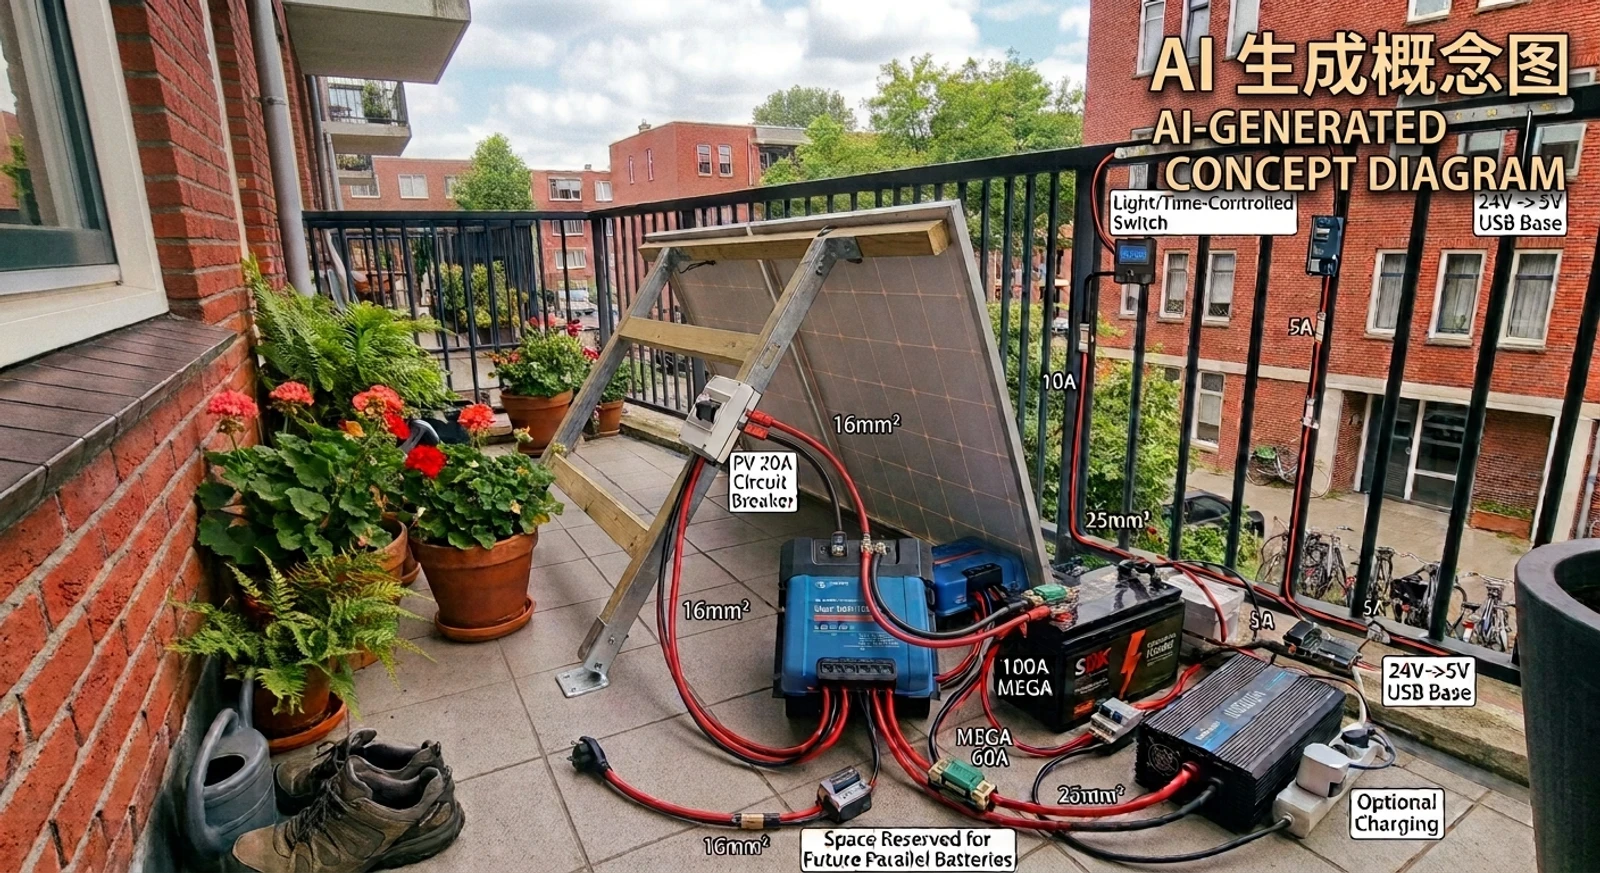
Overview
This is a DIY project: a solar storage system built around low-power flexible panels. In its current form it exists to run LED lighting off-grid. If the system later expands, or needs to feed high-load household devices, the panels upgrade to fixed rooftop modules.
The interesting engineering problem here is a voltage-matching constraint: a battery can only be charged when the solar array’s operating voltage sits comfortably above it, and that single rule decides almost everything downstream: panel configuration, battery voltage, controller choice. Everything in this design follows from that rule.
Requirements
| Requirement | Target |
|---|---|
| Night lighting | LED, 50W × 8h = 400Wh per night |
| Storage | 2 × 12V 100Ah LiFePO₄ in series = 24V (~2.5kWh, expandable) |
| Solar | 2 × 300W portable semi-flexible panels (low-power stage; rooftop panels are the future upgrade for high loads) |
| 230V backup | 24V × 100A ≈ 2400W theoretical output (short-time capability, see §04) |
| Sourcing | Solar panels + battery locally; everything else cross-border |
Design Process
01 Research: The Voltage-Matching Constraint
The core rule comes from MPPT charge controllers: they only start charging when the solar array voltage exceeds battery voltage +5V, and they need roughly battery +1V to keep charging. The chosen 300W semi-flexible camping panels run at 20Vmp, too low to charge a 24V battery on their own; in series they give 40Vmp / 50Voc, comfortably above any 12V or 24V threshold, and far under the controller’s 100V ceiling even at −20°C.
The MPPT-to-battery connection uses 16mm² cable, limited by the MPPT’s 16mm² maximum terminal size; ideally 25mm² would be used to leave proper safety margin.
On the market side: 12V packs dominate the Dutch camper/boat market, so the storage side settled on 2 × 12V 100Ah. Wiring rules, fuse placement and charge parameters were verified against Victron’s manuals, the Wiring Unlimited guide and documented DIY builds.
02 System Architecture
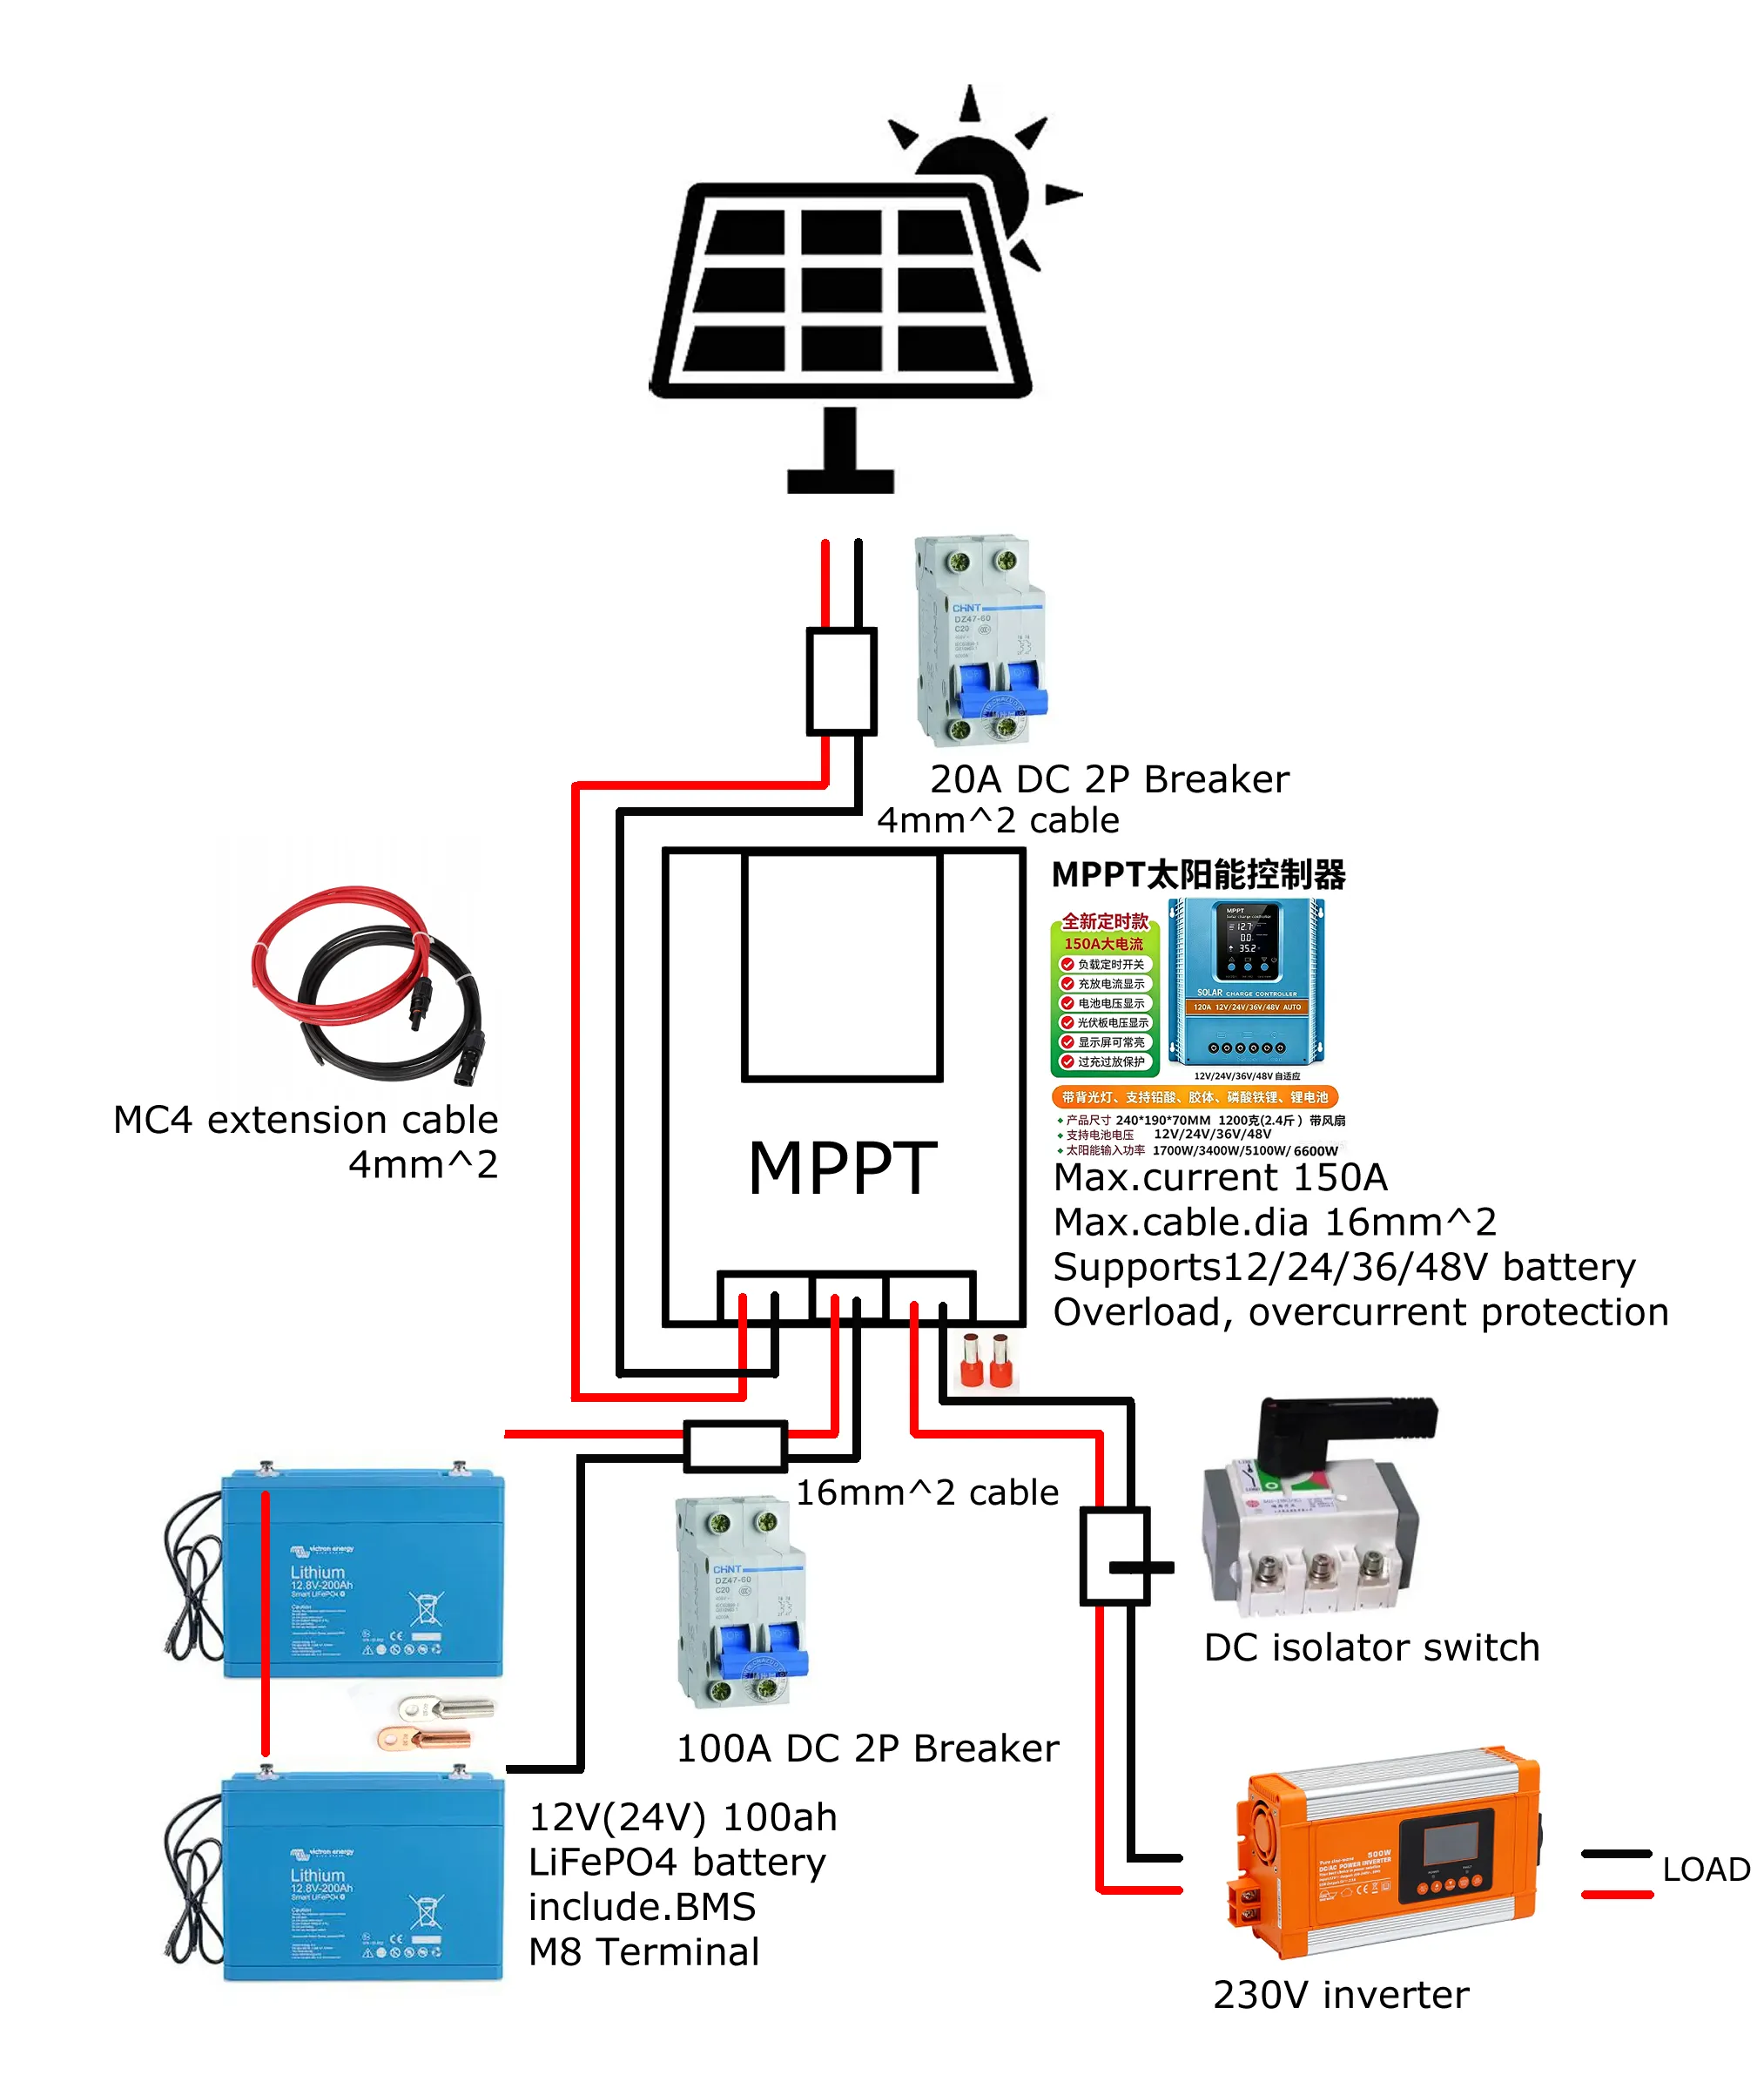
The controller is a 6-port MPPT (PV / BAT / LOAD), which means the busbar is built into the controller: solar connects to the PV terminals, the battery reaches the BAT terminals through a 2P DC breaker, and loads hang directly off the LOAD terminals; no external busbar needed. At any instant the battery current equals load current minus solar current; the battery is the only bidirectional device, absorbing the surplus or covering the deficit automatically.
The two 12V batteries are wired in series for 24V: this keeps the inverter branch at a 100A-class current (24V × 100A = 2400W theoretical output). Paralleling at 12V would need 200A, beyond what the MPPT supports. Each battery carries its own built-in BMS.
03 Key Decisions
| Item | Decision | Why |
|---|---|---|
| Battery | 2 × 12V 100Ah LiFePO₄ in series = 24V (100A BMS each, built-in) | Series keeps the inverter branch at 100A class (24V×100A=2400W); same model & batch; confirm BMS supports series |
| Panels | 2 × 300W semi-flexible in series | Portable-first; series is mandatory for 20V panels; rooftop panels are the future upgrade |
| Controller | 6-port MPPT (PV / BAT / LOAD) | Load output built in, the busbar lives inside the controller; BAT terminals take max 16mm² |
| Inverter | Pure-sine inverter (24V input) | 2400W theoretical, short-time |
| Protection | DC-only non-polarized breakers + isolator switch | Breakers sized to cable ampacity; DC-rated only, AC breakers cannot quench DC arcs |
04 Efficiency Estimate: the 230V Chain
Every conversion stage takes a cut. Typical efficiencies at this power level:
| Stage | Typical efficiency |
|---|---|
| MPPT DC-DC conversion | 92–95% |
| LiFePO₄ charge + discharge round trip | ~95% |
| Pure-sine inverter DC→AC | 88–93% |
Multiplying the full chain (panel → battery → inverter → 230V):
0.94 × 0.95 × 0.90 ≈ 80%
Expect roughly 77–84% end-to-end in practice (typically ~80%). For comparison, the LED path skips the inverter entirely (≈90% through MPPT + battery), which is why lighting runs directly on DC and 230V stays a reserve: every kWh pushed through the inverter chain leaves about a fifth behind.
05 Protection & Safety
- PV side: 20A 2P non-polarized DC breaker, doubling as a maintenance isolator; the MPPT-to-battery line runs through a 2P DC breaker (battery isolation). All breakers/switches must be DC-rated and non-polarized; AC breakers cannot quench DC arcs.
- LOAD branches: the LED hangs directly on the LOAD port (via a light/timer switch); the inverter branch runs through a DC isolator switch used for daily on/off, which also kills idle draw.
- Wiring standards: the MPPT uses the common green screw-clamp terminal blocks, paired with pin ferrules (no tinned wire ends, solder creeps); closed copper lugs onto M8 studs (no open lugs); hydraulic crimp; red/black discipline.
- Batteries in series: same model, same batch; confirm the BMS supports series connection; fully charge both before series wiring.
- Commissioning: polarity check before powering anything, battery first and PV second, charge parameters set per the LiFePO₄ 24V spec.
BOM Overview
Sourcing strategy: the solar panels and the battery come from Dutch shops (warranty and shipping logic); everything else, MPPT, inverter, breakers, isolator, cables, terminals and accessories, comes from Taobao cross-border. Prices converted at €1 = ¥7.81. The full spec with the wiring list lives in the project folder; this is the condensed version.
| # | Item | Spec | Qty | Est. price | Source |
|---|---|---|---|---|---|
| 1 | Solar panel | 300W semi-flexible, ETFE, MC4 leads | 2 | €150–250/pc | Local / Taobao |
| 2 | MPPT controller | 6-port (PV/BAT/LOAD), BAT terminals max 16mm² | 1 | ≈ €26.9 | Taobao |
| 3 | Battery | 12V 100Ah LiFePO₄, built-in BMS, low-temp cut-off | 2 | €230–280/pc | NL local |
| 4 | Inverter | Pure-sine, 24V input, ≥2000W | 1 | €102–192 | Taobao |
| 5 | DC breaker (PV side) | 20A 2P, non-polarized, ≥250V DC | 1 | €3.8–10.2 | Taobao |
| 6 | DC breaker (MPPT–battery line) | 100A 2P, non-polarized | 1 | €5.1–12.8 | Taobao |
| 7 | DC isolator (inverter branch) | 100–125A 2P, non-polarized | 1 | €7.7–19.2 | Taobao |
| 8 | PV extension cable | MC4 connectors, 1–2m male/female | 2–4 | €1.3–3.8 | Taobao |
| 9 | DC cable | Pure copper, 2-core 16mm², 5m total | 1 | ≈ €20.1 | Taobao |
| 10 | Small-load cable | 2.5mm² red + black | 3m each | €0.3–0.5/m | Taobao |
| 11 | Pin ferrules | Copper VE16-18, 16mm² | 100 pcs | ≈ €1.3 | Taobao |
| 12 | Copper lugs | SC16-8, closed type, M8 | 20 pcs | ≈ €3.1 | Taobao |
| 13 | Crimping tool | Hydraulic lug crimper, 4–120mm² | 1 | ≈ €21.5 | Taobao |
| 14 | Accessories pack | WAGO 221 connectors, heat shrink, zip ties, tape | 1 pack | €2.6–5.1 | Taobao |
| 15 | Battery case | EVA hard case (fits 100Ah) | 2 | €3.8–10.2/pc | Taobao |
Budget ≈ €1000–1400 all-in. Build phases: (1) order long-lead parts, (2) DC stage: panel, breaker, MPPT, batteries, LED, (3) inverter + isolator, (4) winter field tests, (5) documentation and demo.
Current Status
Done: requirements, architecture, protection scheme, BOM draft. Next: procurement and build. The project documentation is maintained alongside this page and updated as the build progresses.