Overview
So I decided to finally tackle ABS. If you’ve spent any time in 3D printing communities, you know the reputation — it warps, it shrinks, it clogs, and if you so much as breathe on it wrong during a print, it’ll peel right off the bed. But I kept coming back to the same question: is it really that hard, or do most people just not spend enough time understanding what’s actually going on?
This log is my attempt to answer that. I ran 15 tests on a Bambu Lab A1, messing with enclosure temperatures, heater wattages, fan speeds, print speeds, and whatever else I could tweak. Along the way I jammed my hotend more times than I’d like to admit, learned a lot about heat creep, and eventually got to a workflow that actually works.
I’m writing this up not as a polished guide, but as the real journey — failures, dead ends, and the moments where things finally clicked.
What I Wanted to Figure Out
I wasn’t just chasing a good print. I wanted to understand why ABS behaves the way it does, and whether a consumer printer like the A1 (which isn’t exactly marketed as an ABS machine) could handle it reliably with the right setup.
ABS is appealing for functional parts because it handles heat better than PLA, takes impacts better than PETG, and lasts. But the printing environment matters way more than slicer settings alone. I wanted to:
- See how enclosure temperature actually affects warping and adhesion (not just read about it)
- Figure out what failure modes pop up most often
- Test whether thermal stability matters more than absolute temperature
- Understand which variables actually move the needle vs. which ones I was wasting time on
- End up with a process I could actually repeat, not just get lucky once
Material Background
Why ABS
ABS is that material everyone tells you to use for “real” parts — the ones that need to survive heat, impacts, and time. It’s an engineering thermoplastic, not a hobbyist one, and that shows in both its strengths and its attitude problem.
Compared to PLA and PETG, it demands more from your printer: better temperature control, less airflow, more patience. But when you need a bracket that won’t soften in a hot car or a functional part that’ll still be holding up a year from now, it’s hard to beat.
ABS vs PLA and PETG
PLA
PLA is the easygoing one. Prints beautifully, barely warps, smells like waffles. I use it for prototypes and decorative stuff all the time.
But it gives up at surprisingly low temperatures — leave a PLA part in direct sun and it’ll deform. Impact resistance isn’t great either. Fine for desk toys, less so for anything that’ll actually work for a living.
PETG
PETG sits in the middle. Stronger than PLA, tougher, and way less finicky than ABS. It’s my go-to for most functional prints.
The tradeoff is heat resistance — it’s better than PLA but doesn’t touch ABS. If you need something to survive near boiling water or a hot engine bay, PETG isn’t your answer.
ABS
ABS brings the heat resistance and impact toughness. That’s the draw.
The catch: it’ll warp if the enclosure is too cold, jam if the hotend cooling is inadequate, and generally punish you for cutting corners on temperature control. It’s honestly a stress test for your entire printer setup — not just the extruder, but your enclosure design, your thermal management, everything.
The Filament I Used
The ABS I tested with was sponsored by a friend. It had been sitting at room temperature for quite a while, which probably didn’t do the moisture content any favors. Before any test print, I dried it at 65°C for 8 hours to get it back to a reasonable state. I mention this because filament condition matters — if you’re struggling with ABS and haven’t dried your spool recently, start there before changing anything else.
Test Setup
Here’s what I was adjusting between experiments:
- Nozzle temperature
- Bed temperature
- Enclosure temperature
- Heater power
- Cooling fan speed
- Print speed
- Glue or no glue on the bed
- Build plate cleanliness
- Brim / draft shield usage
- Material profile (custom vs. generic)
- Temperature control method (manual vs. automatic)
Baseline conditions
For most tests, I kept these constant:
- ABS filament (obviously)
- Heated bed on
- Enclosure sealed
- Cooling fan as low as I could set it
- Build plate cleaned beforehand
- Brim and draft shield on when I thought they’d help
- Custom material profile
Experimental Log
Test 1 & Test 2
Open Test 1 & Test 2 details
Test 1
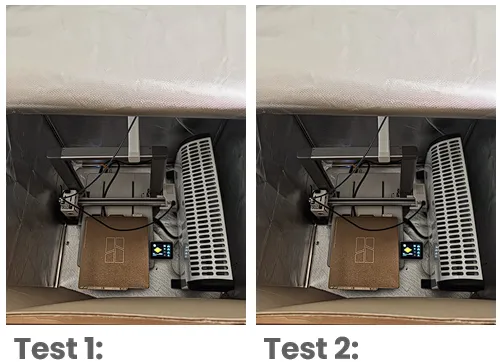
Settings:
- Nozzle: 250°C
- Bed: 100°C
- Heater: Off
- Temperature control: Manual
- Glue: None
- Ambient temperature: 17°C
- Enclosure temperature: 25°C
Test 2
Settings:
- Nozzle: 250°C
- Bed: 100°C
- Heater: 750W
- Temperature control: Manual
- Glue: None
- Ambient temperature: 16.8°C
- Enclosure temperature: 50–60°C
Test 1 & 2 Analysis
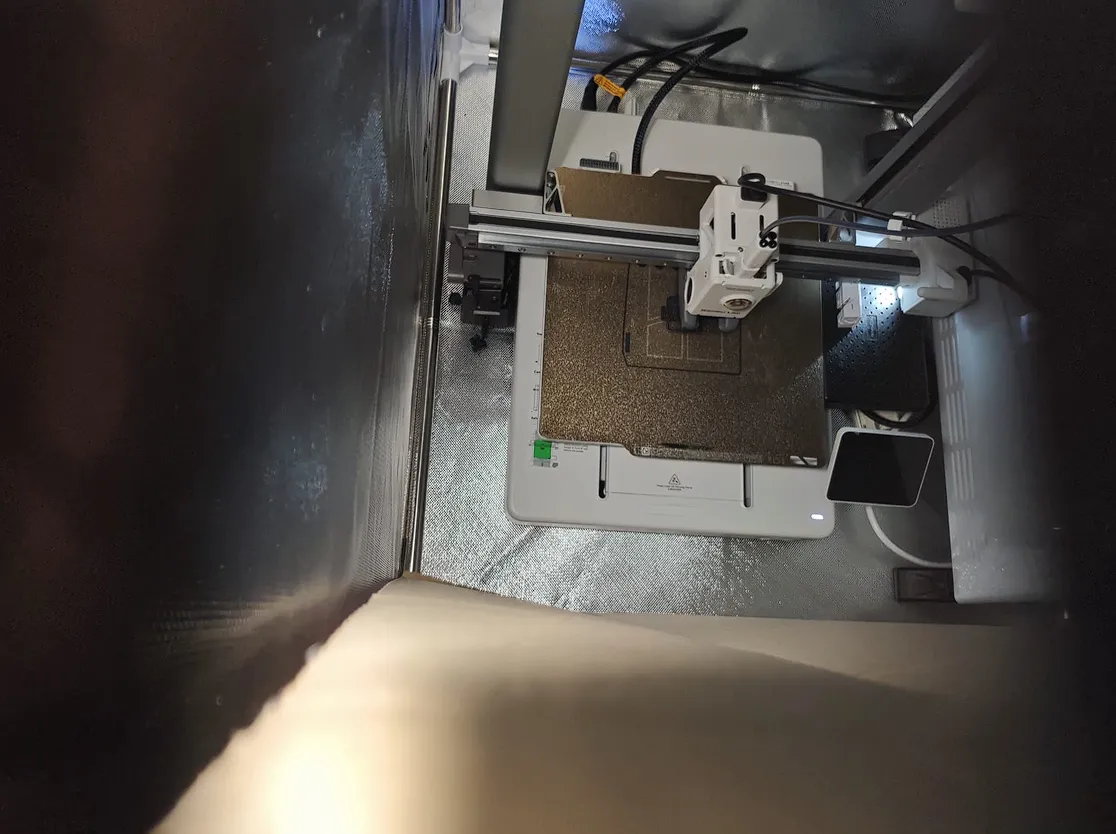
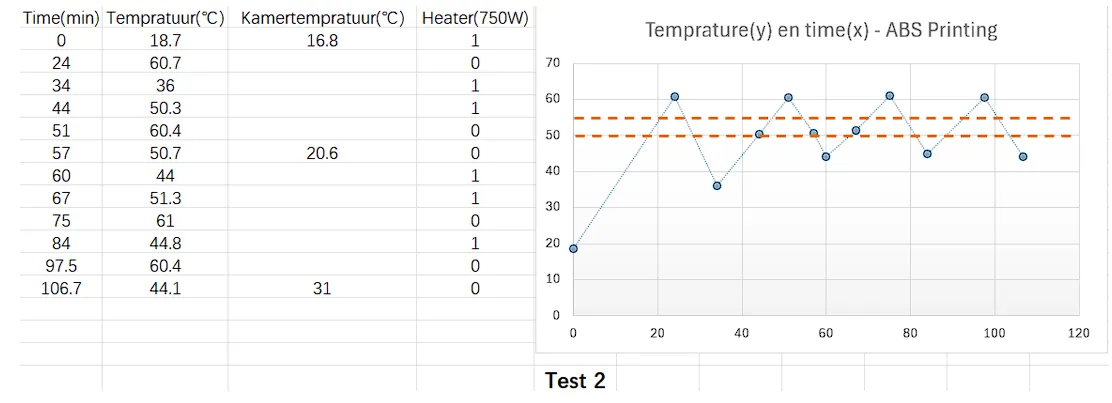
Right out of the gate, I learned my first lesson: a 750W space heater and manual control don’t mix. The enclosure temperature bounced between 36.7°C and 61°C — that’s a 24-degree swing, which is basically a rollercoaster for a material as shrink-happy as ABS. The print failed around the 40-minute mark.
The real problem was my sensor placement. I’d stuck the temperature probe near the top of the enclosure, separated from the actual printing volume by a cardboard layer. So the reading I was chasing was lower than the true temperature at the bed. The area around the nozzle was almost certainly hotter, which pushed things into heat creep territory — the filament softened before reaching the melt zone, the extruder gear lost grip, and everything ground to a halt.
What I took away: the sweet spot for the enclosure looked like 50–55°C. And manual heater control was never going to hold it there. I needed a thermostat-controlled outlet, the sensor right in the print volume, and a tight hysteresis band (maybe 5°C) to avoid those big overshoots.
Test 3
Open Test 3 details
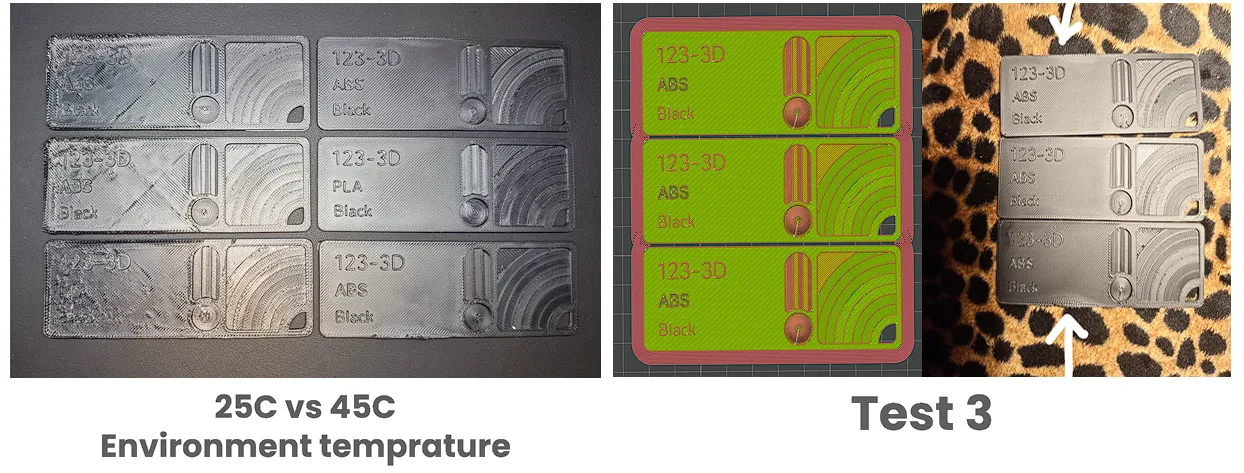
The thermal equilibrium idea
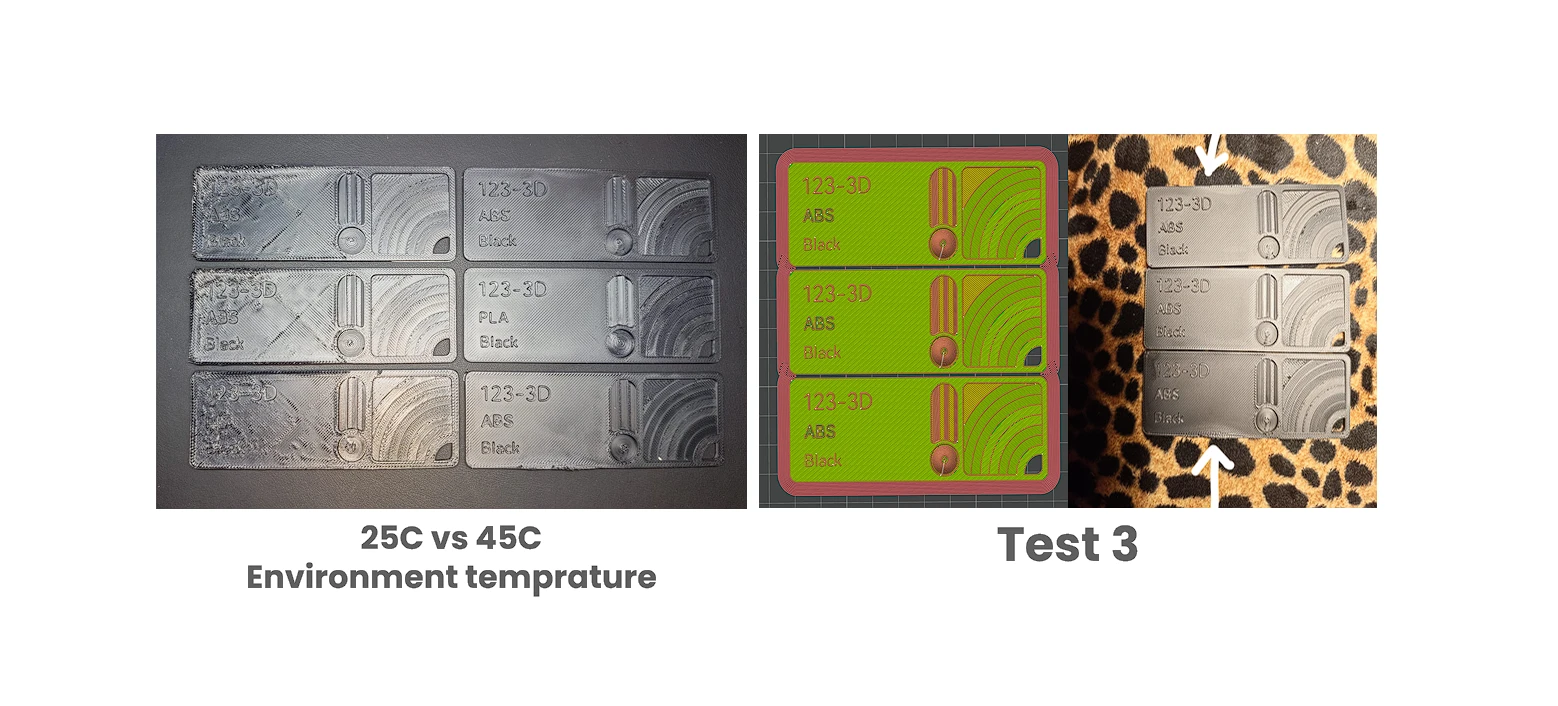
I dropped the heater to around 400W and suddenly things calmed way down. The enclosure sat between 42–44°C — not the 50–55°C I was aiming for yet, but at least it was stable. At this wattage, heat input roughly matched what was leaking out through gaps, the enclosure walls, and natural convection. That balance killed most of the wild fluctuations.
I printed three identical parts at the same time and noticed something interesting:
- The middle part came out almost perfect.
- The top and bottom parts showed visible warping.
The center of the enclosure clearly had the most stable thermal conditions. And since the parts shared a brim, shrink forces traveled between them — the outer positions got the worst of it while the middle stayed relatively protected.
The takeaway: even before you hit the ideal temperature range, where you place parts inside the enclosure matters a lot. Thermal gradients across the build area are real.
Test 4
Open Test 4 details
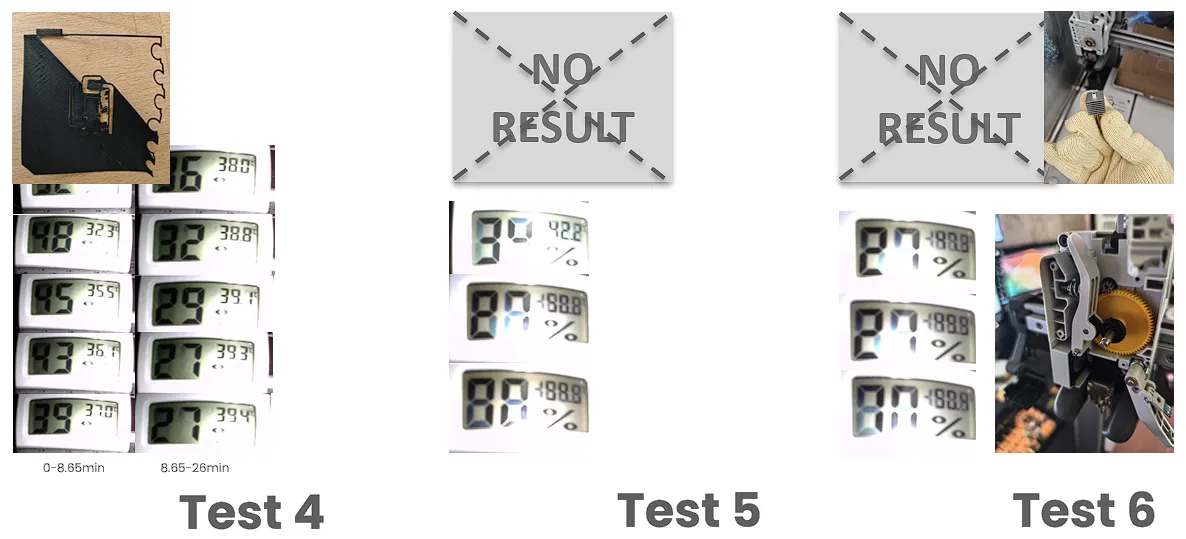
Settings:
- Speed: 100%
- Glue: Yes
- Heater: 350W
- Temperature control: Manual
- Fan speed: Low
- Build plate: Cleaned
- Brim and draft shield: Enabled
- Material profile: Custom ABS
Another failure, and this one was on me for being too conservative with the heat. The average enclosure temperature hovered around 40°C — not nearly warm enough to keep the part happy. The filament jammed in the upper section of the hotend. I had to tear the hotend down, cut out the blocked section, and reassemble the whole thing. Not fun at 11 PM.
Test 5
Open Test 5 details
Settings:
- Speed: 50%
- Glue: Yes
- Heater: 375W
- Temperature control: Manual
- Fan speed: Low
- Build plate: Cleaned
- Brim and draft shield: Enabled
- Material profile: Generic ABS
Made a dumb mistake here: didn’t check the extrusion path after Test 4’s jam. Residual blockage killed this print too.
But I did learn something useful: a 375W heater could actually hold the enclosure at 50–55°C for extended periods. So lower power plus decent insulation was clearly the way to go — less overshoot, more stability.
Test 6
Open Test 6 details
Settings:
- Speed: 100%
- Glue: Yes
- Heater: 370W
- Temperature control: Manual
- Fan speed: Low
- Build plate: Cleaned
- Brim and draft shield: Enabled
- Material profile: Generic ABS
This one failed and I honestly couldn’t pin down exactly why. Maybe moisture in the filament, maybe the glue wasn’t doing its job, maybe something else entirely. I did a full maintenance pass — lubricated the motion system, checked everything I could think of — but the root cause stayed elusive.
By this point I was genuinely considering just giving up on ABS and switching to PETG or ASA. Six tests in and I didn’t have a single clean print to show for it.
Enclosure Upgrade
After six failures, I figured the enclosure itself needed work before I’d learn anything useful. I made two changes.
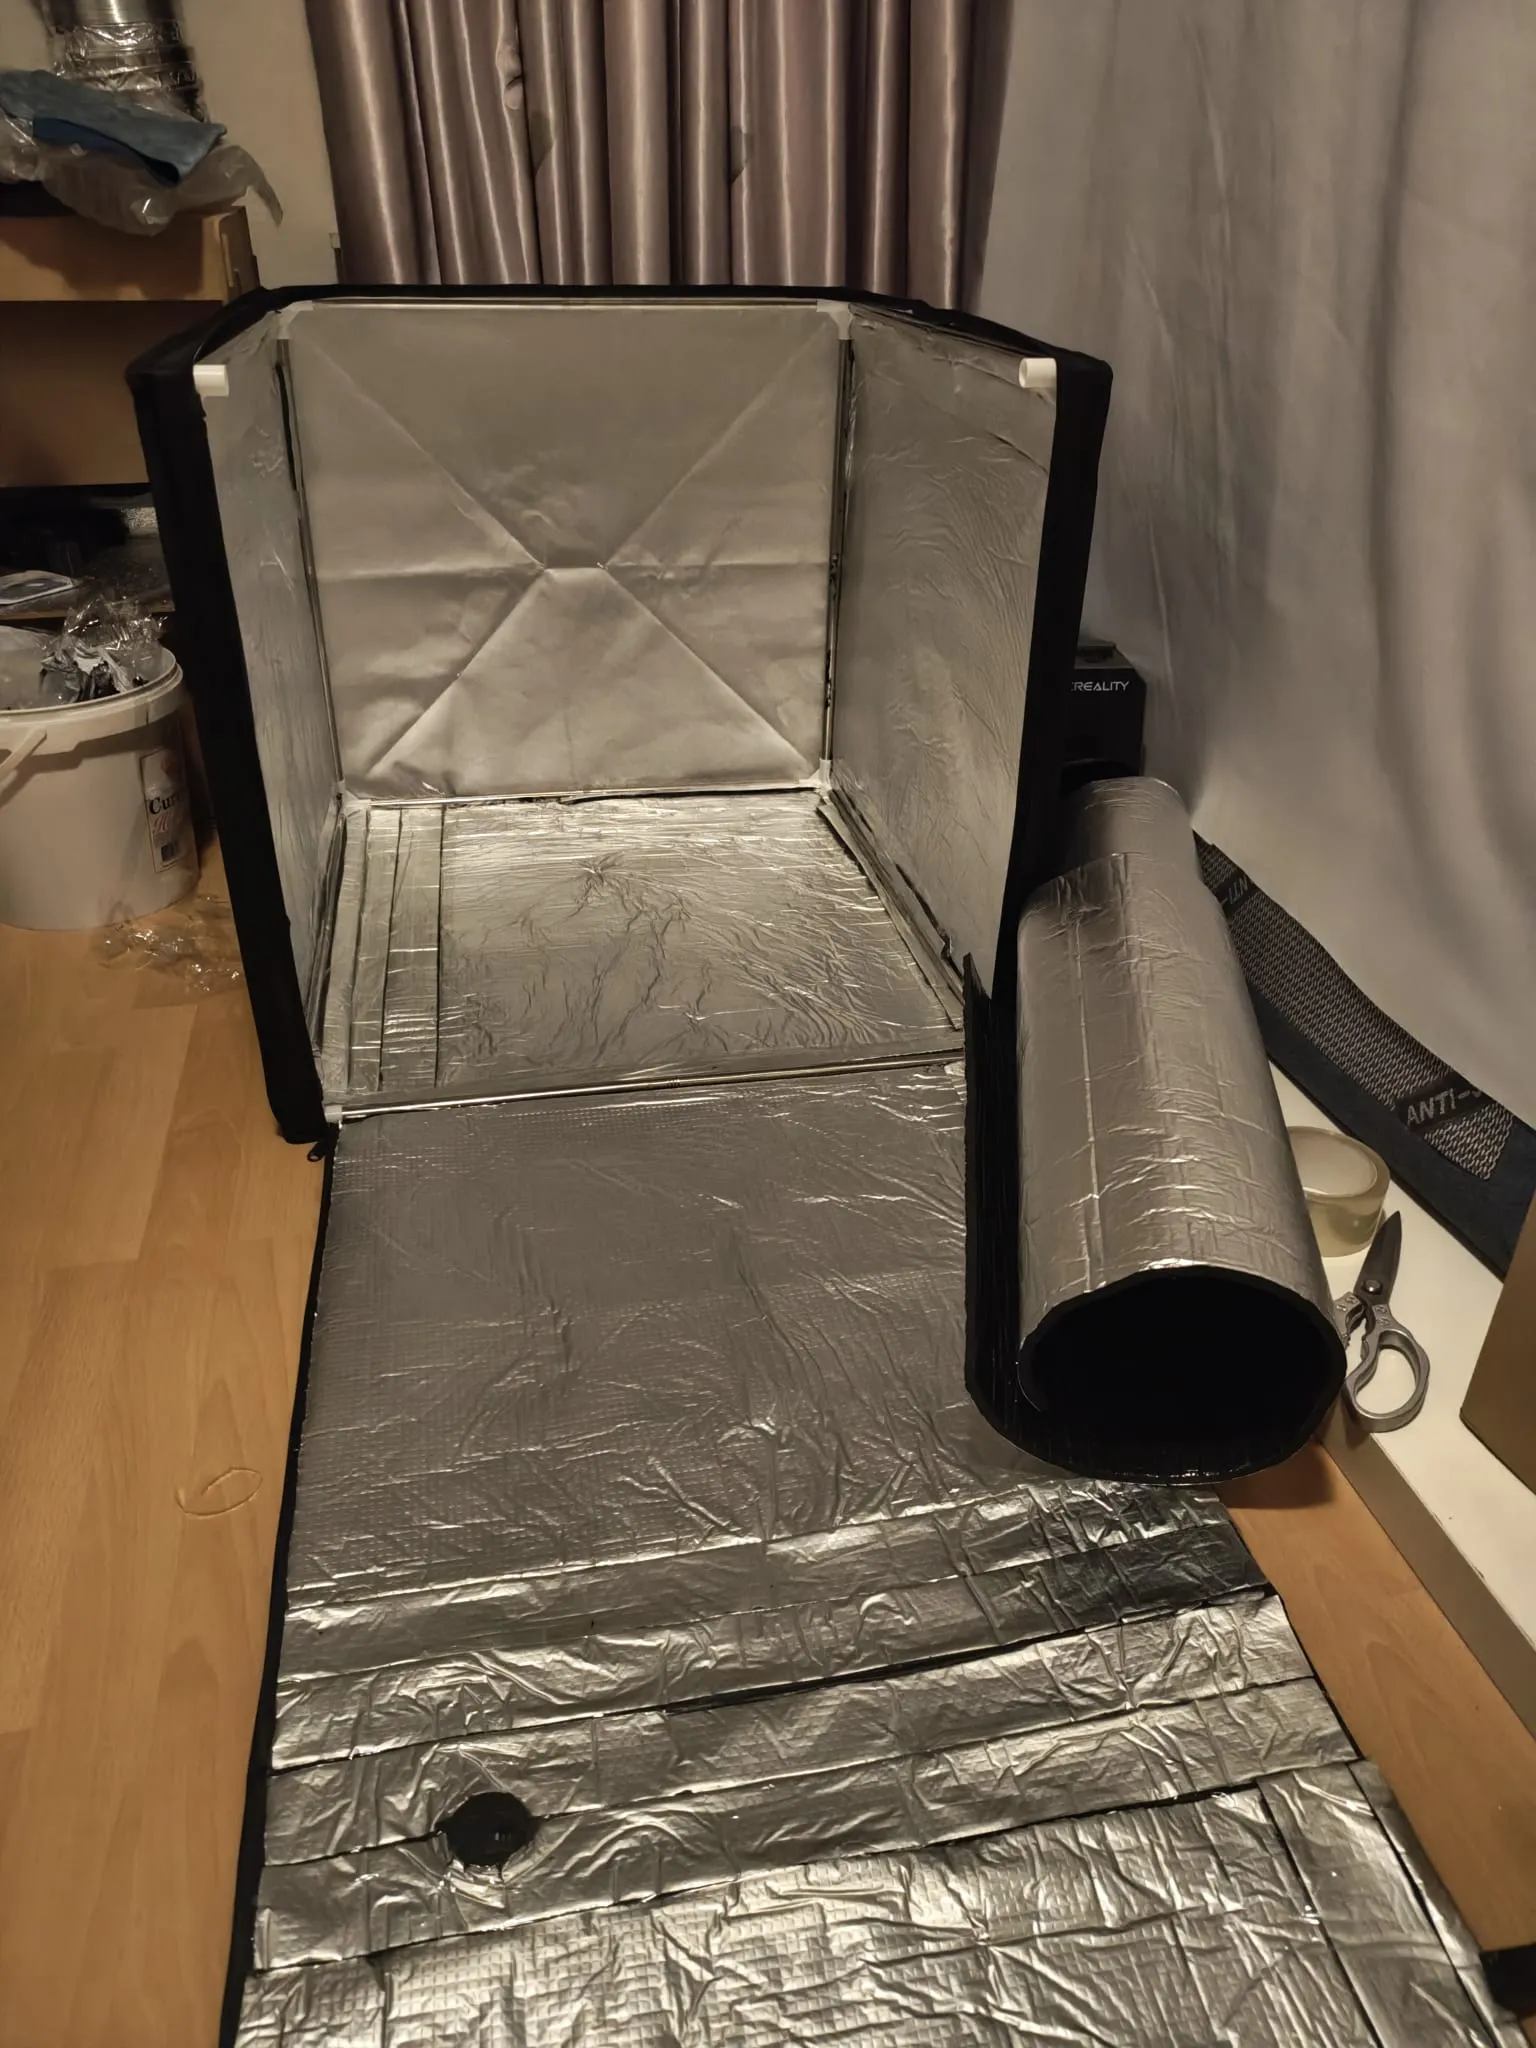
1. Better insulation
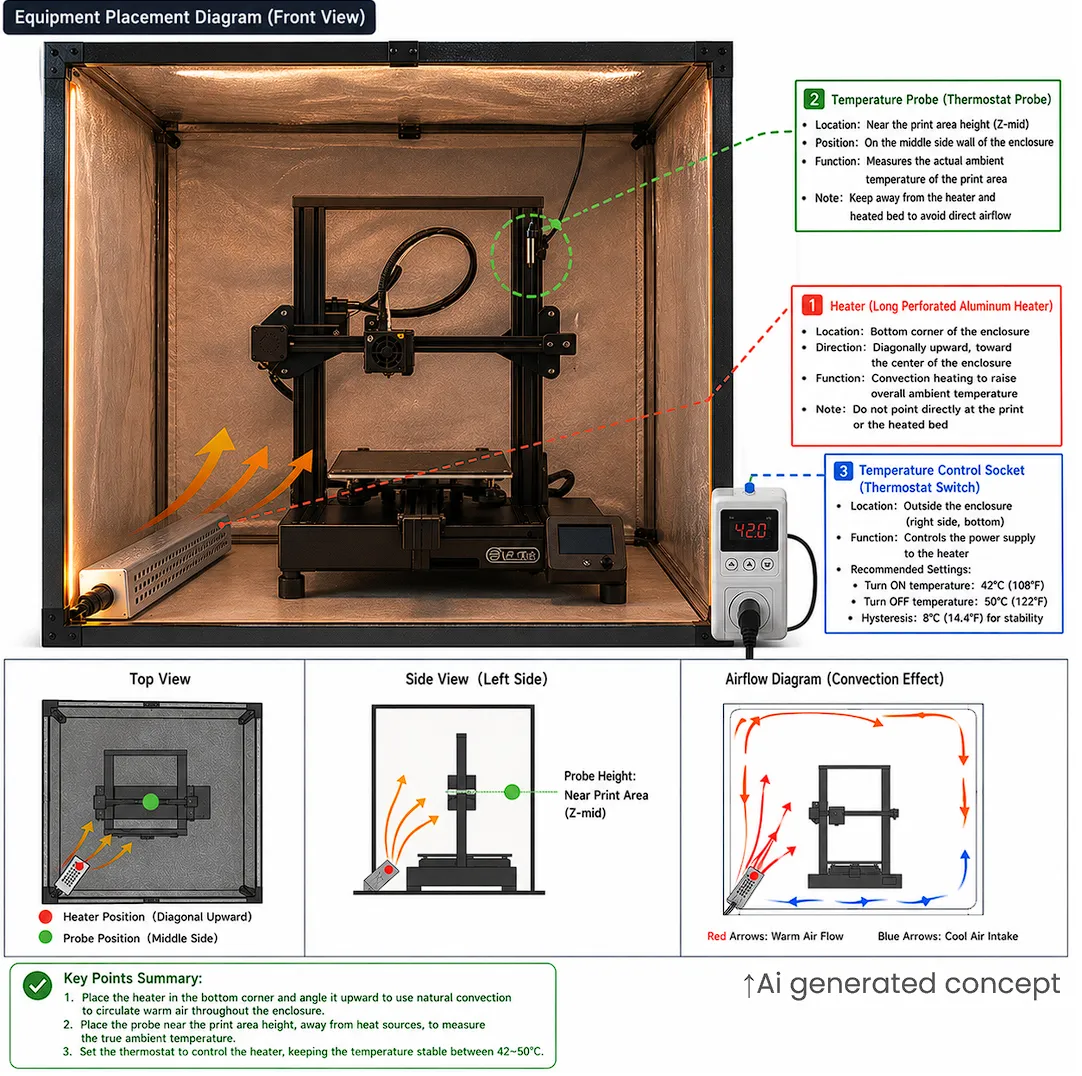
I lined the enclosure with 10 mm aluminum-coated foam insulation — all four sides and the top — and sealed up the seams. The idea was straightforward: slow down heat loss, smooth out temperature swings, raise the thermal time constant so the enclosure doesn’t swing wildly every time the heater cycles.
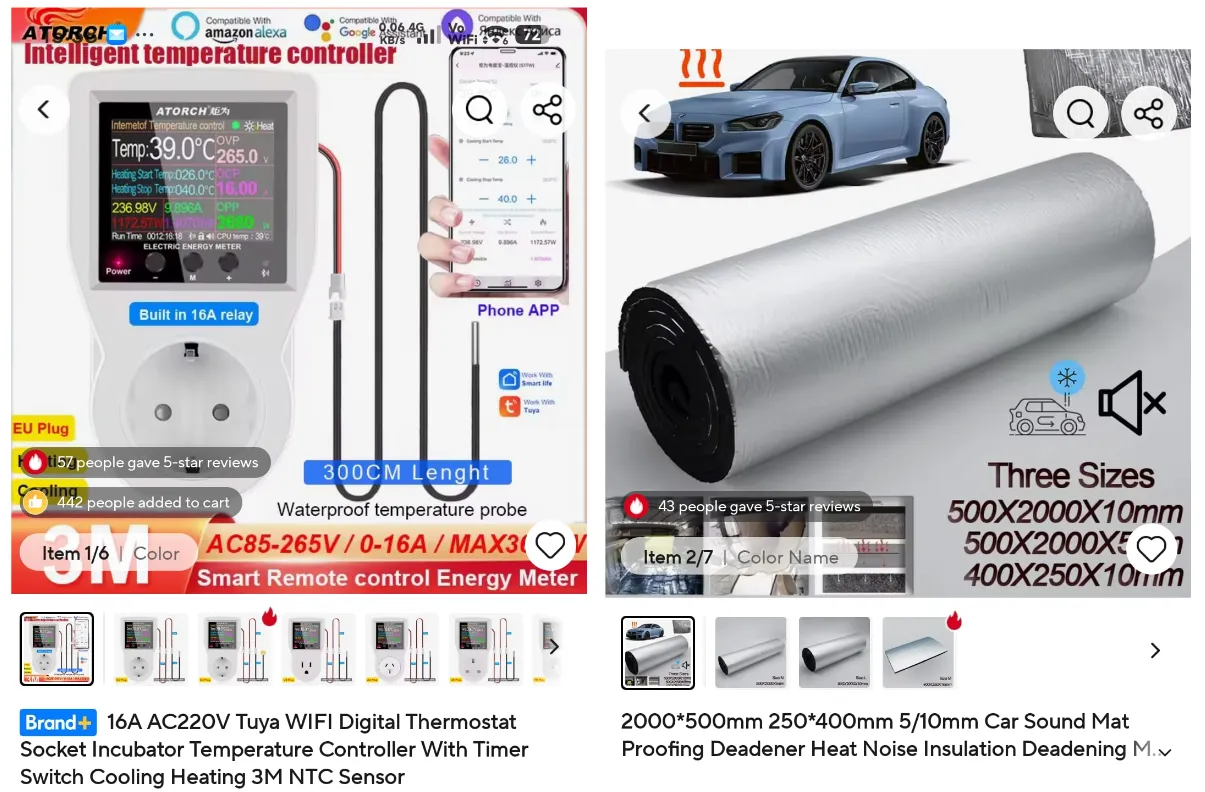
2. Automatic temperature control
I added a thermostat-controlled outlet with a simple on/off logic:
- Heater ON below 48°C
- Heater OFF above 51°C
There’s still some thermal inertia — after the heater cuts off, the temperature creeps up another 2–3°C before cooling down — but compared to me squinting at a thermometer and flipping a switch, this was a massive improvement.
Passive Cooling Comparison
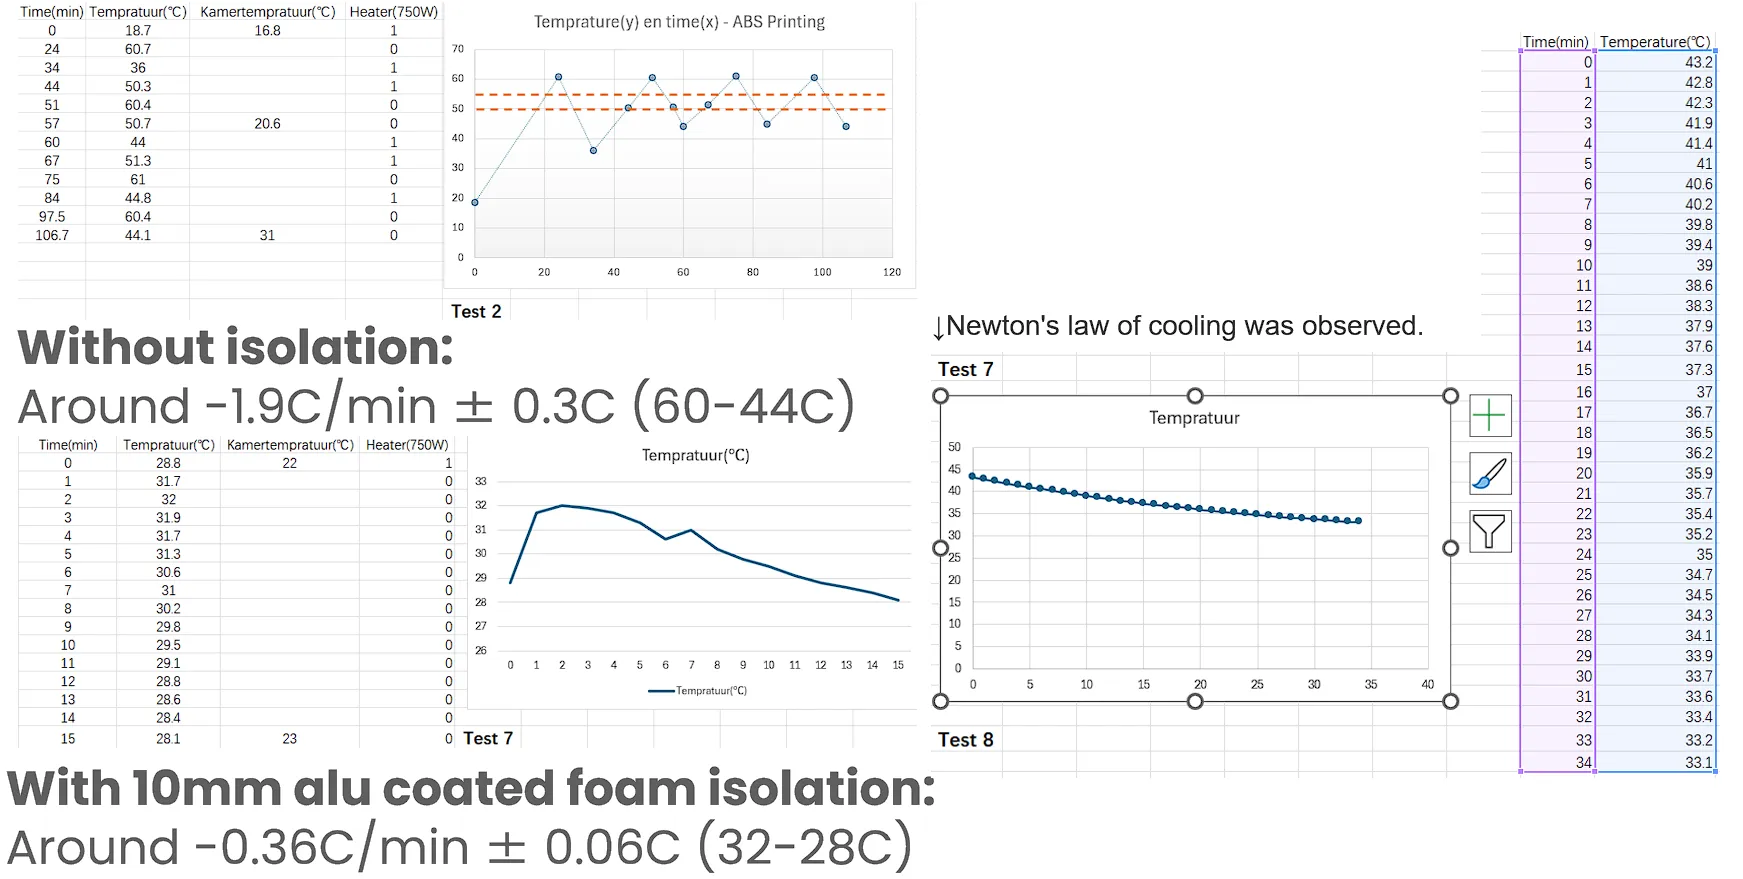
I measured the cooling curve before and after the insulation upgrade. It’s not a perfectly controlled comparison (ambient temperatures weren’t identical, and the conditions varied), but the trend is clear: the insulated enclosure holds heat dramatically longer. Newton’s law of cooling at work — smaller temperature difference between inside and outside means slower heat loss. The insulation effectively increased the thermal time constant.
Test 7
Open Test 7 details
Settings:
- Speed: 100%
- Glue: None
- Heater: 370W
- Temperature control: Automatic
- Fan speed: Low
- Build plate: Cleaned
- Brim and draft shield: Enabled
- Material profile: Generic ABS
- Insulation upgrade: 10mm aluminum-coated foam
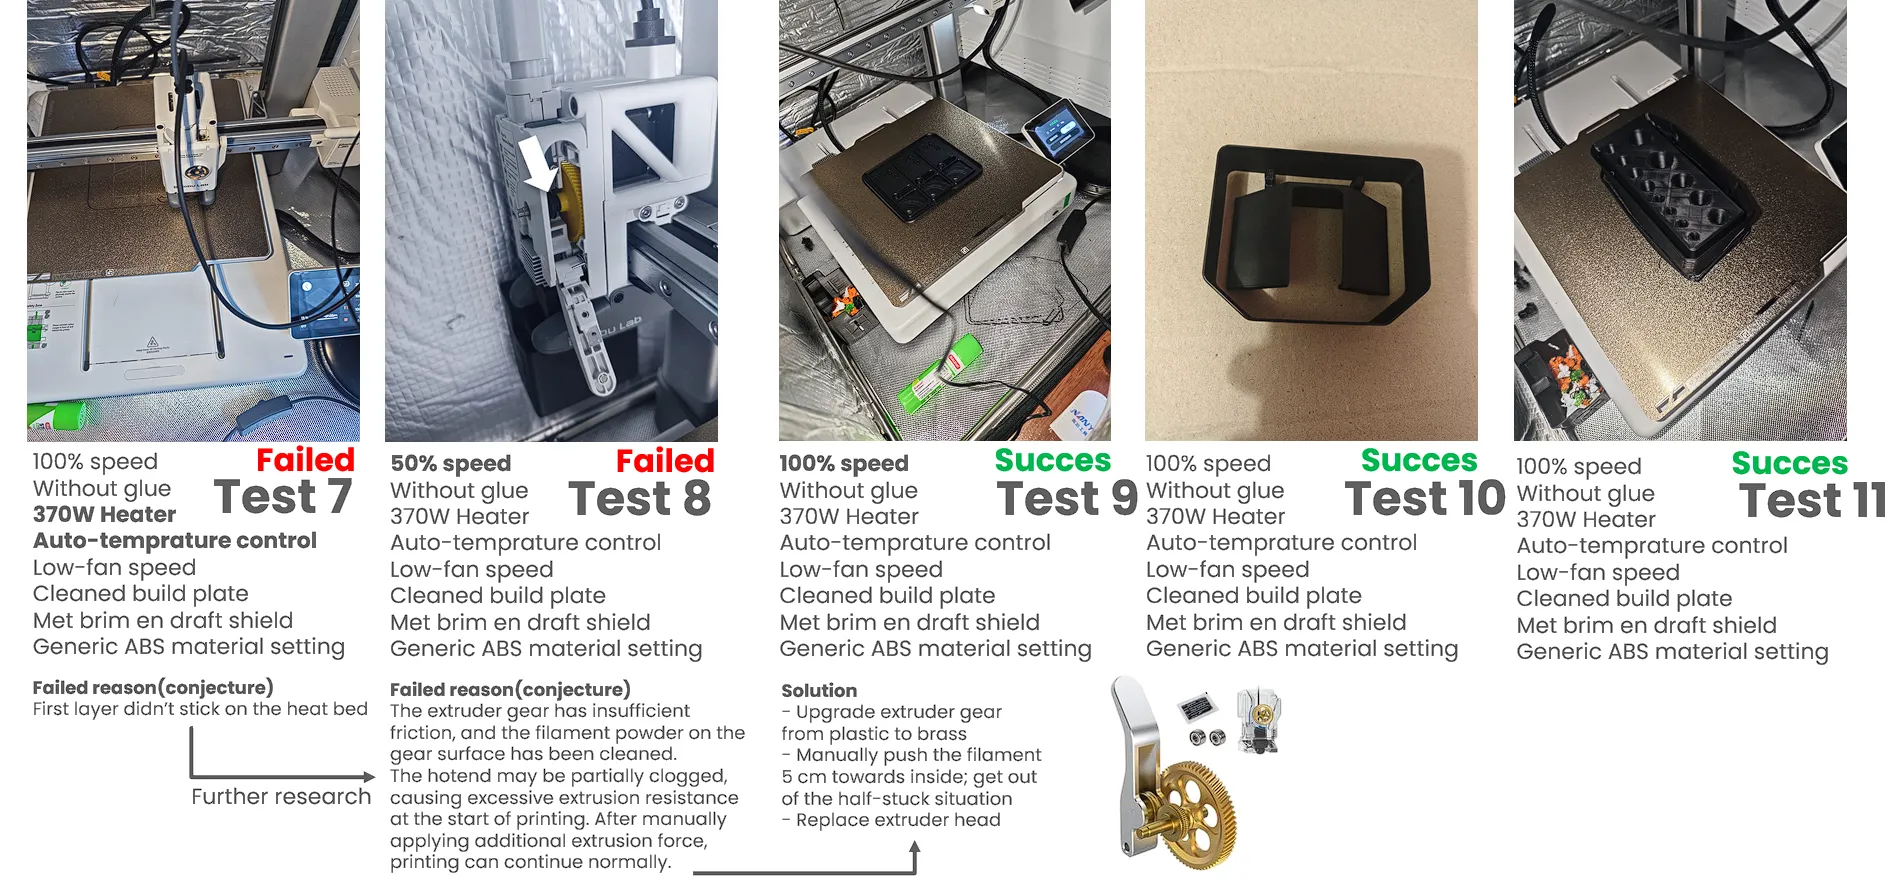
Finally, the enclosure temperature was under control. But a new problem surfaced: the first layer wouldn’t stick properly. This told me enclosure temperature wasn’t the whole story anymore. Something else was off — maybe extrusion consistency, first-layer calibration, or bed surface condition.
Test 8
Open Test 8 details
Settings:
- Speed: 50%
- Glue: None
- Heater: 370W
- Temperature control: Automatic
- Fan speed: Low
- Build plate: Cleaned
- Brim and draft shield: Enabled
- Material profile: Generic ABS
I halved the print speed to see if slower extrusion would improve adhesion and reliability. It helped a bit, but didn’t solve the underlying issue. Whatever was wrong, it wasn’t just speed.
Test 9
Open Test 9 details
Settings:
- Speed: 100%
- Glue: None
- Heater: 370W
- Temperature control: Automatic
- Fan speed: Low
- Build plate: Cleaned
- Brim and draft shield: Enabled
- Material profile: Generic ABS
This is where the real failure mechanism started making sense to me.
What I think was happening
1. The extruder gear wasn’t gripping well enough
Filament dust had built up on the gear teeth, reducing friction. When the filament needed a solid push, the gear just spun against it instead of driving it forward.
2. Partial clogging in the hotend
There seemed to be increased resistance somewhere in the extrusion path. When I manually pushed the filament forward with some extra force, extrusion recovered almost immediately.
How I got it going again
- Push the filament forward manually by about 5 cm.
- This breaks through whatever partial blockage is in there.
- Normal extrusion resumes.
My theory: the warm enclosure softens the filament a bit before it reaches the melt zone. Softer filament means less stiffness, which means the extruder gear’s pushing force doesn’t transmit as effectively. It’s a subtle thing, but once you’ve seen it happen a few times, it’s unmistakable.
Test 10 & Test 11
Open Test 10 & Test 11 details
Test 10
Settings:
- Speed: 100%
- Glue: None
- Heater: 370W
- Temperature control: Automatic
- Fan speed: Low
- Build plate: Cleaned
- Brim and draft shield: Enabled
- Material profile: Generic ABS
Test 11
Date: 2026-04-29
Settings:
- Speed: 100%
- Glue: None
- Heater: 370W
- Temperature control: Automatic
- Fan speed: Low
- Build plate: Cleaned
- Brim and draft shield: Enabled
- Material profile: Generic ABS
From Test 9 onward, things finally stabilized. After 11 tests:
- First 8: all failures
- Test 9 onwards: clean, repeatable prints
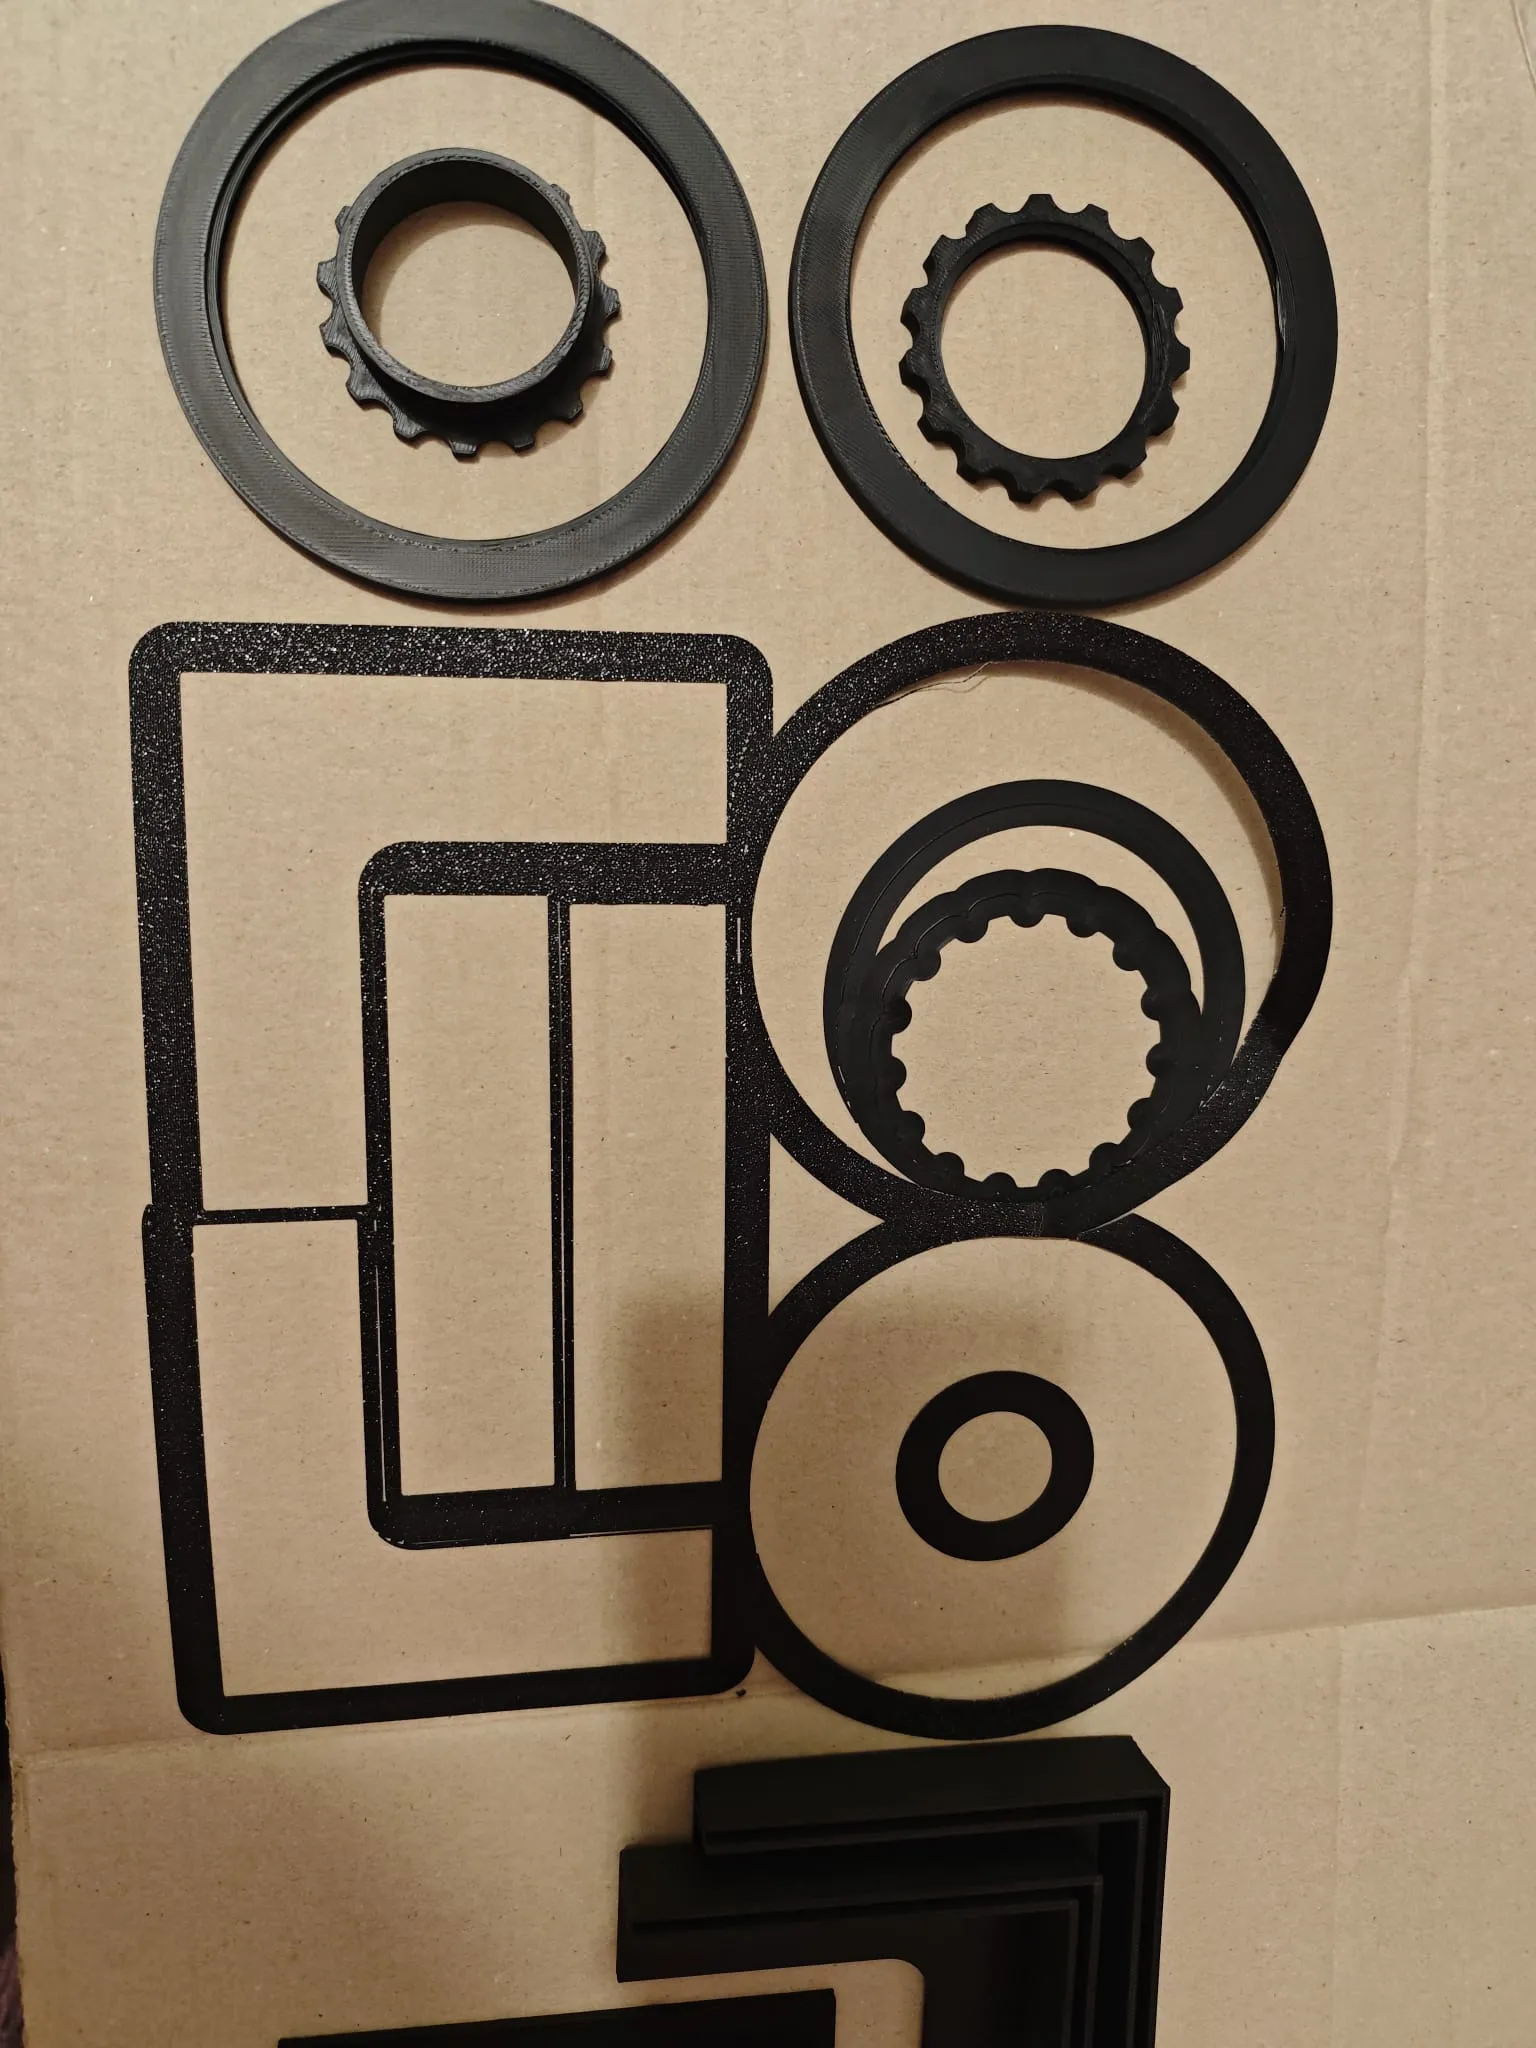
That’s the moment it flipped from “I have no idea what I’m doing” to “okay, I can actually do this reliably.”
Test 12-15 Update
Open Test 12-15 details
Test conditions
Settings:
- Speed: 100%
- Glue: None
- Heater: Off
- Temperature control: Off
- Fan speed: Low
- Build plate: Cleaned
- Brim and draft shield: Only brim
- Material profile: Generic ABS
- Nozzle temperature: 255°C → 260°C
I’ll be honest — these weren’t the most controlled tests. I was changing multiple things at once, which is bad experimental practice but sometimes you just want to see if the thing works under simpler conditions.
Results: slight edge warping, but nothing catastrophic. This suggests the enclosure heater might not actually be mandatory for smaller parts, which is good to know. But if you’re printing something large or flat, I’d still want the temperature control in place.
The temperature balancing act
There’s a real tradeoff here:
Too cold
- Higher shrink stress
- More warping
- Layers don’t bond as well
Too hot
- Heat creep becomes more likely
- Filament softens before it should
- Clogging risk goes up
The sweet spot seems to be a compromise between thermal stability and extrusion reliability — you can’t optimize for one without watching the other.
What I learned about clogging
Here’s something that surprised me: clogging wasn’t just about enclosure temperature. I saw clogs happen even when the enclosure was around 30°C. So it’s not that simple. Other factors matter too:
- Hotend temperature
- Filament condition
- Extruder grip force
- Mechanical resistance in the feed path
Bumping the nozzle from 255°C to 260°C noticeably reduced how often clogs happened. The slightly hotter melt flows more easily and puts less back-pressure on the extruder.
Final failure analysis
Tests 12–14 failed. Test 15 succeeded.
The main culprit wasn’t enclosure temperature this time. It was the extruder gear.
Extruder gear slipping
The stock gear on the A1 just doesn’t bite hard enough under certain conditions. Here’s what I think happens during a cold start:
- The filament cools unevenly.
- Resistance builds up inside the extrusion path.
- The gear can’t push hard enough to overcome it.
- It starts grinding against the filament instead of feeding it.
- Material stops reaching the nozzle.
My temporary fix: manually push down on the filament to help the gear overcome that initial resistance. Once extrusion recovers, the print runs normally.
Long-term fix: replace the stock plastic gear with a hardened steel one. More bite, less slip.
Problems I Ran Into
Cooling and thermal issues
- Enclosure below ~45°C: warping almost guaranteed
- Enclosure above ~55°C: heat creep starts becoming a real risk
- High temperatures compromise the hotend cooling fan’s effectiveness
- Cooling fan running too fast undoes all your enclosure work
- Bed temperature wasn’t always optimal
- Drafts and cold airflow killed first-layer adhesion
- Manual enclosure temperature control was basically useless
- Passive heat loss through uninsulated walls was way too high
Extrusion and mechanical issues
- Filament grinding at the extruder gear
- Gear couldn’t maintain consistent grip
- Partial hotend clogs that came and went
- Heat creep softening filament in the cold zone
- Excessive extrusion resistance
- Possibly moisture in old filament
Adhesion issues
- First layer wouldn’t always stick, even with a clean bed
- Glue didn’t reliably help
- Bed cleaning needed to be more thorough than I was doing
What Actually Helped
Here’s the practical stuff that moved the needle, in rough order of impact:
Hardware upgrades worth doing
- Insulate the enclosure properly (the 10mm foam made a huge difference)
- Add thermostat-controlled heating (manual control is a waste of time)
- Consider a hardened steel extruder gear
- The hotend itself was fine — I never actually needed to replace it
Process changes that matter
- Clean the build plate more carefully than you think you need to
- Keep the cooling fan as low as possible
- Use a brim — it’s simpler and often more effective than a full draft shield
- Tune speed to what the material can handle, not what the printer is capable of
- If ABS keeps fighting you, ASA is a legitimate alternative worth testing
- Better filament matters — old, poorly stored ABS is fighting with one hand tied behind its back
Extrusion reliability fixes
- Check the extruder gear for filament dust buildup regularly
- Clear partial blockages before they become full clogs
- Don’t be afraid to manually assist feeding if the gear is struggling
- A slightly higher nozzle temp (255→260°C) made a noticeable difference
Extruder Gear Thoughts
I considered swapping the stock gear for a brass one, but I’m not convinced that’s actually an upgrade. Brass conducts heat better, which means more warmth creeping up into the filament path — potentially making the softening problem worse, not better.
A hardened steel gear seems like the safer bet. Better bite, less thermal conductivity, and it won’t wear down the same way.
9. Future Work
Stuff I’d like to test when I get around to it:
- ABS vs. ASA head-to-head under identical conditions
- A higher-quality ABS brand to see how much the filament itself matters
- Different insulation thicknesses and their effect on thermal time constant
- A more sophisticated thermostat setup with tighter hysteresis
- Different build plate surfaces
- Documented extrusion recovery procedures that don’t involve panic
- Actually controlled experiments where I change one variable at a time (novel concept, I know)
The big lesson on methodology: changing three things at once might get you to a solution faster, but you won’t know which thing fixed it. Next round I want to be more disciplined about isolating variables.
10. Self Reflection
This project changed how I think about 3D printing. ABS isn’t just “hard mode” PLA — it’s a completely different animal that exposes weaknesses in your setup that easier materials let you ignore.
I went into this thinking it was about slicer settings and temperatures. I came out realizing it’s about system integration: how the material, the enclosure, the extruder mechanics, and the measurement tools all interact. A failure isn’t just a ruined print — it’s a diagnostic signal. Warping tells you something about thermal gradients. Grinding tells you something about feed path resistance. Each failed test was narrowing down what actually mattered.
I also learned that measurement quality matters as much as the thing you’re measuring. My initial temperature sensor placement gave me numbers that were basically lying to me. Once I moved the probe closer to the print area, the data actually reflected reality.
The early tests were messy — I was changing multiple variables, getting frustrated, and making it harder to draw clean conclusions. A better approach would’ve been: one variable at a time, record the environment, keep the test model identical, and repeat successes to confirm they’re real. But honestly, that’s easy to say in hindsight. When you’re in the middle of your sixth failed print, restraint goes out the window.
Overall, I’m glad I stuck with it. Going from “ABS is impossible on this printer” to having a repeatable process is genuinely satisfying.
11. Filament and Printer Setup
Printer
- Printer: Bambu Lab A1
- Nozzle: Bambu Lab Stainless Steel 0.4mm
- Build plate: Bambu Lab PEI Build Plate
Material
- Filament: ABS
- Diameter: 1.75mm
Extrusion System
Original setup:
- Standard Bambu Lab extruder gear
What I’d switch to:
- Hardened steel extruder gear
The stock gear works fine for PLA and PETG, but under the higher resistance conditions ABS creates, its grip isn’t always enough. I considered a full-metal brass gear but the higher thermal conductivity might push more heat into the filament path — probably not what you want when heat creep is already on your list of problems.
Printing Environment
Room temperature: 18–24°C
Typical enclosure temperature during prints: 48–56°C
What I’d aim for: 45–50°C
Higher than 55°C did help with warping resistance but brought heat creep and extrusion issues more often. Lower than 45°C and I’d start seeing corners lift. It’s a narrow window, but once you find it, it’s repeatable.
12. References
-
Bambu Lab Basic Maintenance
https://wiki.bambulab.com/en/a1/maintenance/basic-maintenance -
Bambu Lab - What is Heat Creep?
https://wiki.bambulab.com/zh/filament-acc/filament/heat-creep